
Unique wedding favors will have your guests talking for weeks and Harley-Davidson® themed biker ducks will fit the bill. These motorcycle wedding favors are easy to make although they are a little bit time-consuming. Compared to off-the-shelf wedding favors, they are on the higher end of cost per favor.
These do-it-yourself instructions are for 1 biker duck wedding favor. When purchasing your supplies, make sure to multiply your numbers. If you’ve never dealt with melt and pour soap, please read all the instructions first and do a practice run. After you’ve made one start to finish, you can set up a little mini production line to make the rest.
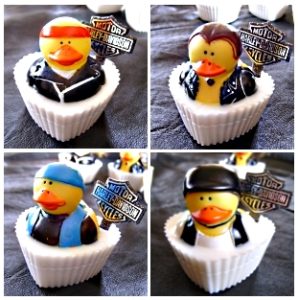
Here are the basic instructions. You’ll find detailed instructions below: You’ll pour part of the soap base in the mold, let it set up, add the duck, the rest of the soap base, add the cupcake pick, seal in the bag, and tie off with ribbons.

What You Need To Make The Biker Ducks Wedding Favors
- 1 Rubber Biker Duck
- 1 2.75″ Heart Shaped Silicone Cupcake Mold
- 2 oz Melt & Pour Opaque Base
- 1 Harley Davidson® Cup Cake Pick
- 12″ of 1/4″ Orange Ribbon Ribbon cut in half
- 18″ of 3/8″ Black Ribbon
- Shrink Wrap Bag (or another plastic bag)
- Heat Gun or Blow Dryer
- Glass measuring cup with a pour spout
- Scale that weighs in ounces is helpful
- Isopropyl Alcohol
- Cotton Ball
- Microwave
Step 1. Gather all of your materials in one spot.
This helps to make sure that you have everything you need and keeps you from running off to find something. You don’t want to be sidetracked why you are melting the soap.
Step 2. Place Soap Base Into Measuring Cup.
If you do not have a scale that measures ounces, take a guess at how much soap base you need. Once melted and poured into the mold, you’ll have a better idea of how much to melt. It won’t be wasted as what you don’t use can be remelted.
Step 3. Microwave 1.5 oz of soap base for 10 seconds.
Check to see how much has melted. Microwave 10 more seconds. Check again to see how much has melted. At this point, you may want to microwave in 5-second intervals until all of the soap base is melted. DO NOT ALLOW TO BOIL. Depending on your microwave, this step could take 30 seconds or less. Helpful Hint: You may remove the soap base from the microwave when almost all of the base has melted and let the residual heat finish melting the rest of it.
Step 4. Pour melted soap base into mold.
Fill the mold to the fill line in the silicone cupcake mold. If your mold does not have a fill line, fill about 3/4 full. Set aside where it won’t be disturbed for 15 to 20 minutes.
Step 5. Place .5 oz of soap base into measuring cup.
Microwave until melted the same way you did the first batch of soap base. DO NOT ALLOW TO BOIL. Depending on your microwave, this step should take 30 seconds or less. Remove from microwave and allow to cool for a few minutes.
Step 6. Dab Soap Base With Rubbing Alcohol
While your second batch of soap base is cooling, put some rubbing alcohol onto a cotton ball and dab the top of the soap in the mold with the alcohol. This is an important step that helps the two layers stick together.
Step 7. Place The Duck
Center your duck on top of the soap after you have rubbed the soap with the alcohol.
Step 8. Pour Melted Soap Around The Duck
Pur melted soap around the base of the duck to the top of the mold. You should be able to pour in one spot, but check to make sure that the soap is settling around the duck to form an even layer.
Step 9. Insert Harley-Davidson® Cup Cake Pick
After a few mins, insert the cupcake pick into the soap and see if it will stand on its own. You want the soap base to be hard enough for the cupcake pick to stand but yet liquid enough that the soap will set up smoothly around the pick. Let set and do not disturb while the soap is setting up. (You can usually find these on eBay.
Step 10. Remove The Mold
After about ½ an hour, you can remove the mold from your soap. Start in one spot and pull the mold away from the soap all around the top. Once you have done that, you can finish pulling the mold off the rest of the soap.
Step 11. Let Sit Overnight
Let the biker duck wedding favors sit for 24 hours before sealing in the bags and tying with your ribbons. Heat shrink bags are not necessary but they give you the best see-through clarity and presentation.
Step 12. Sealing The Favors
Place the favors in the bag, tie shut with 6″ of the orange ribbon and shrink with the heat gun. Hold the gun back about 12″ and slowly move towards the bag. Too much heat and you’ll melt a hole in the bag and the soap will melt too. You can use a blow dryer but it will take much longer as they do not get as hot as a heat gun.
Step 13. Finish Decorating
After you have shrunk the bag to your liking, add the other orange ribbon and tie a bow with the black one.